STEP 1.
Begin by measuring the area of the room you wish to install heated floors into, and input your results. The quote tool will show you which electric floor heat kit will fit your project area. It will also give help you understand more about the costs involved.
STEP 2.
Choose between:
Prova uncoupling membrane OR QuickStrap Cable Straps
Both options are floor mounting hardware that are necessary to attach the heat wire system to the sub floor and keep the wires spaced evenly and correctly.
Prova uncoupling membrane, is a recycled polyethylene floor stiffening underlayment, known as uncoupling membrane, with heat wire system channels conveniently built into the patented design. This underlayment will help to make floor last much longer and bridge over imperfections that may already be in the existing sub-floor.
Or choose:
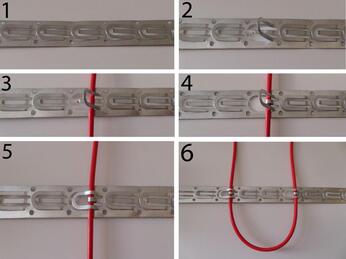
QuickStrap Cable Straps, for a loose wire system. These are metal straps that are mounted to floor with built in 1" spacers to help you run heat wire from one side of the room to the other in an M or W pattern, while keeping the correct spacing. These are a less expensive option, and are easy to work with in odd shaped rooms with many angles.
Prova uncoupling membrane OR QuickStrap Cable Straps
Both options are floor mounting hardware that are necessary to attach the heat wire system to the sub floor and keep the wires spaced evenly and correctly.
Prova uncoupling membrane, is a recycled polyethylene floor stiffening underlayment, known as uncoupling membrane, with heat wire system channels conveniently built into the patented design. This underlayment will help to make floor last much longer and bridge over imperfections that may already be in the existing sub-floor.
Or choose:
QuickStrap Cable Straps, for a loose wire system. These are metal straps that are mounted to floor with built in 1" spacers to help you run heat wire from one side of the room to the other in an M or W pattern, while keeping the correct spacing. These are a less expensive option, and are easy to work with in odd shaped rooms with many angles.
sTEP 3.
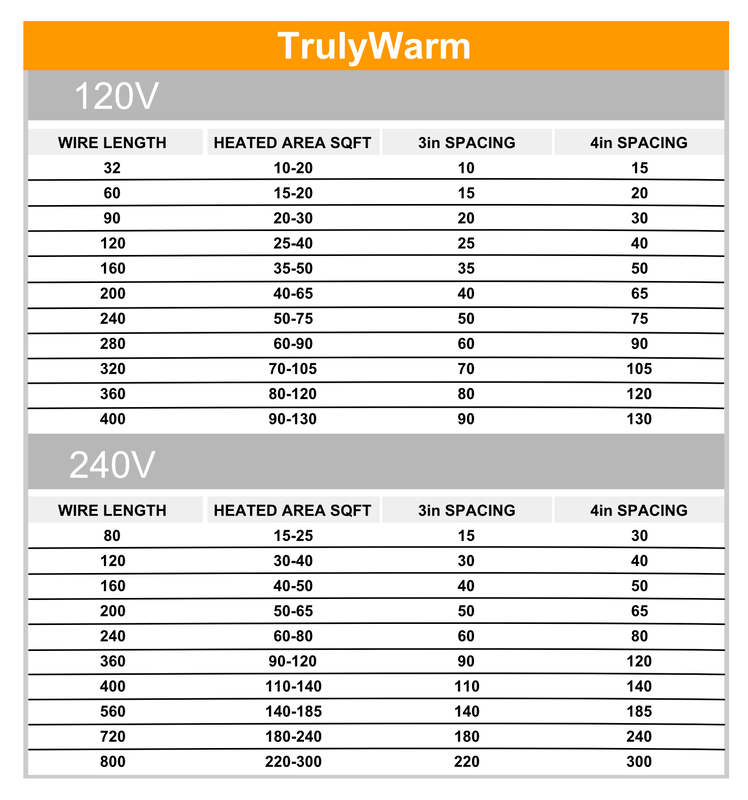
Determine if you will be using 120V or 240V power:
Every floor heat system will need a power source and a dedicated breaker. A certified electrician will be required for your installation process to connect the power from the breaker box, to the floor heat thermostat controls. The FAQ will help provide further information if you are unsure.
Every floor heat system will need a power source and a dedicated breaker. A certified electrician will be required for your installation process to connect the power from the breaker box, to the floor heat thermostat controls. The FAQ will help provide further information if you are unsure.
STEP 5.
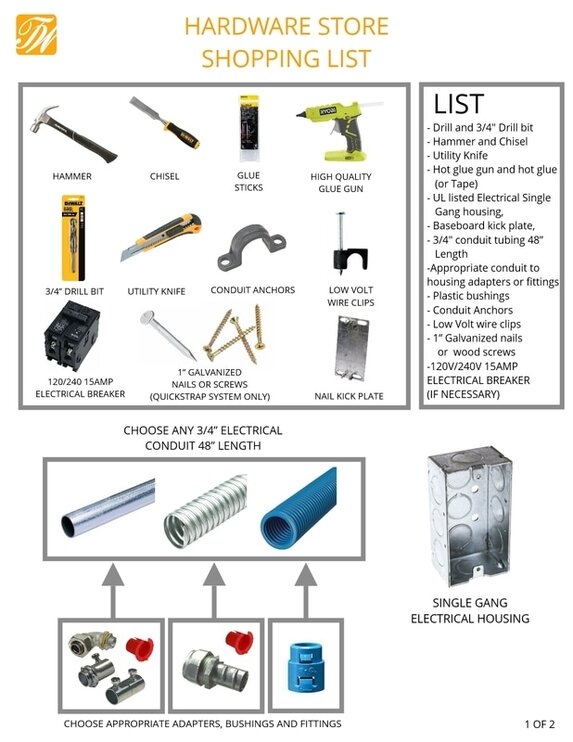
Plan out what tools and accessories are needed for your unique installation.
We have provided a Printable hardware store shopping list below. You can also check out our Accessories shop for items like soft face gel knee pads, Safe install ALERTBUDDY, digital multi meters, repair kits, even heat wire safe plastic blade mortar trowels.
We have provided a Printable hardware store shopping list below. You can also check out our Accessories shop for items like soft face gel knee pads, Safe install ALERTBUDDY, digital multi meters, repair kits, even heat wire safe plastic blade mortar trowels.
step 6.
Who can install the product?
DIY's are always welcome and we will work to provide all the knowledge you need to enjoy your newly warm home. If you come across something you need help with, call us! We'll personally walk you through it! Also keep in mind that there may be a professional contractor near you, who could install our products in a snap, and follow all warranty procedures.
Find contractors near you at the bottom of the home page!
step 7.
Think about your options. Add more heating if necessary.
While you may have already calculated which areas you would like to heat, do not forget, Truly Warm heat wires may be installed in tile showers as well! As long as the installation instructions are followed and there is a waterproof barrier above the heat wire. This provides a moisture-free bed for the heat system so it functions the same as in a dry area.
Two separate heat wires will need to be purchased and run through one control thermostat for shower installations.
Here's where to find our recommended waterproofing system for tile showers: https://trugarddirect.com/
step 8.
Choose any floor surface you like!
This system may be installed under natural stone, most any tile including luxury vinyl tile, hardwood, floating floors, vinyl, or even carpet (provided flooring manufacturer heat recommendations are not breached) This is because our low profile heat system must always be embedded in a cement based mortar. Leaving a solid floor surface that is ready for any type of floor covering.
This system may be installed under natural stone, most any tile including luxury vinyl tile, hardwood, floating floors, vinyl, or even carpet (provided flooring manufacturer heat recommendations are not breached) This is because our low profile heat system must always be embedded in a cement based mortar. Leaving a solid floor surface that is ready for any type of floor covering.
Questions?
Any remaining questions you still may have about installing this heat system, will most likely be answered in our 9 step Installation Guide that will be included with every Truly Warm kit. We also have a very helpful FAQ help page.
Customer Service is available at:
(678) 723-6655
Any remaining questions you still may have about installing this heat system, will most likely be answered in our 9 step Installation Guide that will be included with every Truly Warm kit. We also have a very helpful FAQ help page.
Customer Service is available at:
(678) 723-6655
|
Here's the spacing rules you should know throughout your project:
QuickStrap Cable Strap Spacing is set at 1" spacing intervals Prova Uncoupling Membrane is set at 1" spacing "PODS" which includes 3" and 4" spacing. When installing: 1. Heat Wires must remain 3" from any walls 2. Keep 2" spacing from cabinets or permanent fixtures 3. Stay 6" away from heat sources, floor drains, and toilet seals 4. Locate your thermostat 4' from any wet areas and out of reach of children
There are a few more helpful rules, they will be covered in the quick installation guide you receive with your TrulyWarm heat system. |
|
| hardware_shopping_list.pdf |
|
LIST
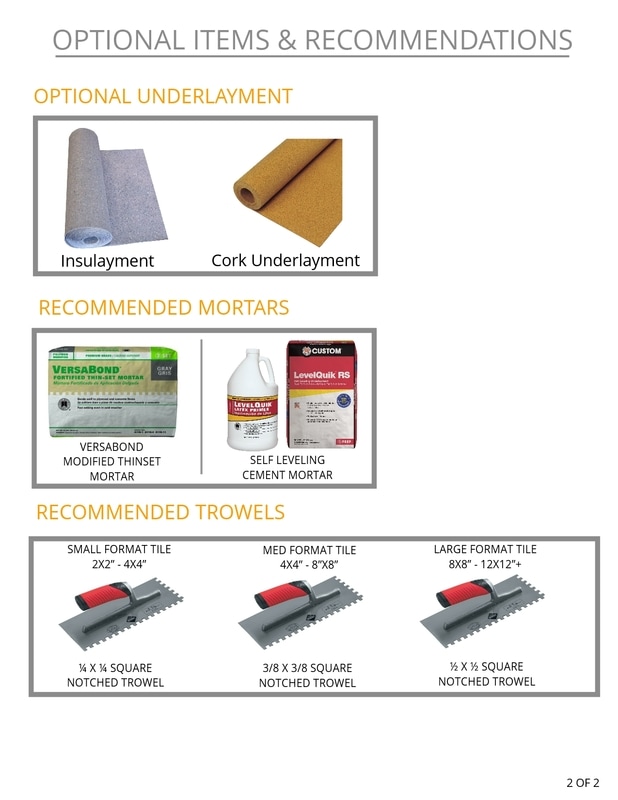
- Drill and 3/4" Drill bit - Hammer and Chisel - Utility Knife - Hot glue gun and hot glue (or Tape) - UL listed Electrical Single Gang housing, - Baseboard kick plate, - 3/4" conduit tubing 48” Length -Appropriate conduit to housing adapters or fittings - Plastic bushings - Conduit Anchors - Low Volt wire clips - 1” Galvanized nails or wood screws -120V/240V 15AMP ELECTRICAL BREAKER (IF NECESSARY) ---- Optional Thermal-Break Underlayment - Insulayment or Similar Cork Underlayment Recommended Mortar Versabond Modified Thinset or Custom Level Quick Self leveling mortar and Primer Appropriate Size Notched Mortar Trowel |
|